
In my prior post on fonter, I walked though how to use the text fonts. Several things have changed from that point in time; including iOS now auto-registers the fonts. So I want to revisit the information and cover what needs to happen with NativeScript 1.5.1 and newer.
Setup
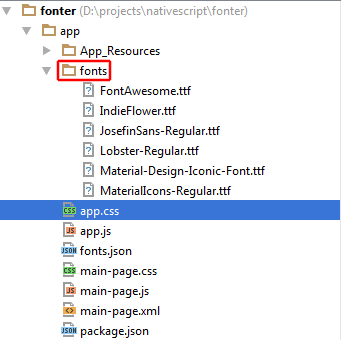 The folder structure is still the same; you still have to create and use the fonts folder inside your app folder. All font files are placed in that folder. Remember this folder is a folder you will have to initially create as it is not created for you by NativeScript when it creates the project for you.
CSS Rules
In the CSS rules, the first font declaration is the one you want to have auto-register. It is the filename of the actual file without the .ttf. So if the file name is called JosefinSans-Regular.ttf, then the CSS rule would be:
.JosefinSans {
    font-family:JosefinSans-Regular,Josefin Sans;
}
The second declaration is the actual internal font name. Android only needs the first declaration; on iOS you might need to have them both. In most cases iOS does appear now to be able to use the font filename; however I have found in some case it still requires the actual internal font name -- so I recommend you include both since it is simpler and you make sure it will work on iOS and Android.
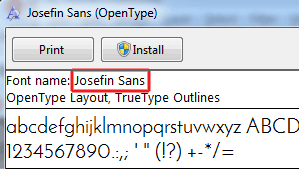
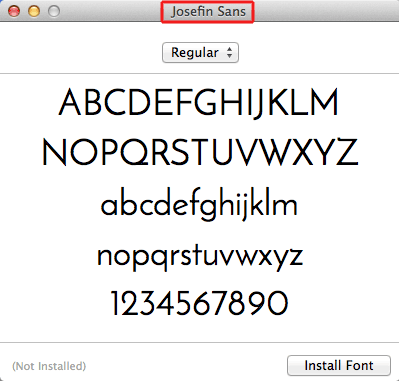
To figure out the internal font name for iOS the procedure is the same as I outlined before; double click on the font, and then look for the font name in the place I highlighted.
Using Fonts
The key to using fonts is to use the class or cssclass in the Declaritive XML; so a Label then has attache <Label text="Cool Text" class="JosefinSans"/> would cause the .JosefinSans css rule to be applied to this Label. Which would mean the "Cool Text" would use the Josefin Sans font since that is what we put in the .JosefinSans css rule above. This the same for all types of fonts, you create the CSS rule with a font-family and then apply it to the Declarative UI element with the cssclass/class on it.
Using Icon Fonts
The new version of Fonter includes not only the three standard text fonts; but I also include three different icon fonts.
- Google's Material Design
- Fontastic
- Material-Design-Iconic
Using Google Material Design Fonts
Lets tackle Google's Material Design first, the thing you need to do is go to to the Material Design website. On this website you can look through the different icons. So in the second row of icons you should see a picture of the android. Click on it and you will see at the bottom of the screen a blue bar appear.
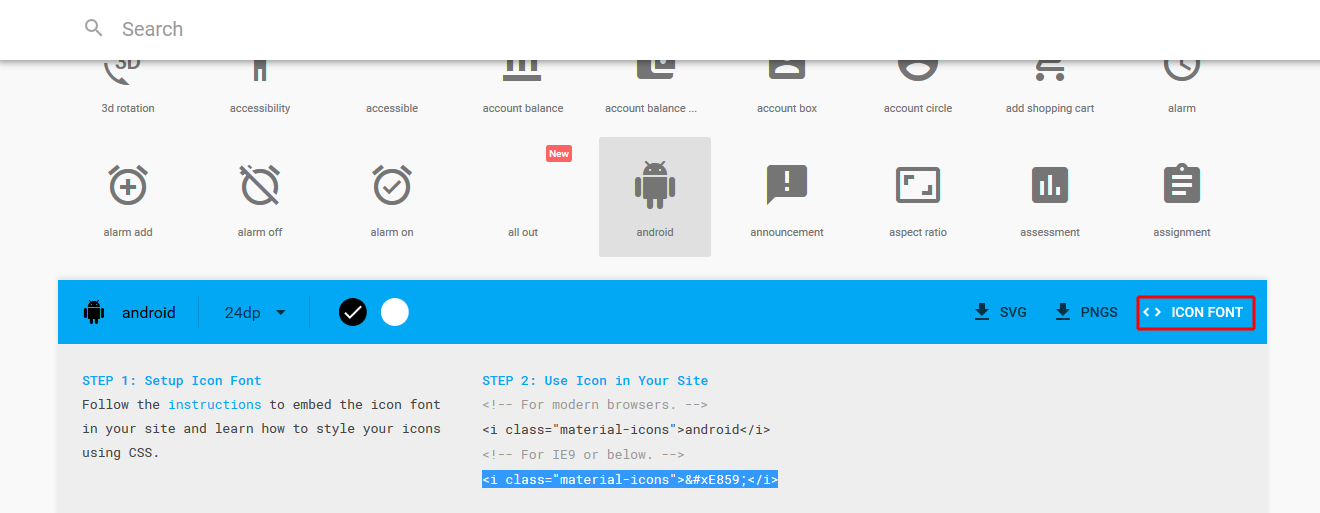 Once the blue bar appears; click the bottom right corner (highlighted in red) where it says Icon Font. It will popup a bit more and show the entire grey screen, and you should see towards the bottom of the screen some text that I highlighed in blue that looks like this: <i class="material-icons"></i>. You see the bolded value? That is what you need to copy to use this icon in your nativescript application.
Fontawesome
Now we need to go to the Fontawesome website. In this case it is much simpler, scroll the cheatsheet until you find the icon you want to use. Then copy the &#x.... number. For example at the top the fa-500px icon would be . Pretty simple to find on Fontawesome's site.
Material-Design-Iconic
 The final site we need to go to is the Material Design Iconic website. Just like the Google site; you need to click on the icon to see the code. So find the icon you want and click on it. And you should see something like this.
The text highlighted in red is the important information. For this icon is say f33b. You prefix that with the &#x and append a semicolon so it will be . And that gives you the code for Google-Material-Iconic
Using the Codes
As you can see all three codes use the same format; NativeScript can use the html entity codes inside the XML to display the characters. So as an example I am going to show you how I use the FontAwesom font; My XML is:
<Label android:text="  " ios:text="  " cssClass="FontAwesome"/>
As you might notice, on Android I am showing the Android picture, on iOS I'm showing the Apple logo. My app.css is this:
.FontAwesome {
    font-family: FontAwesome;
}
That is all that is required to make it work. Proper CSS, XML, and finally the font in the app/fonts folder.
Now their is one other thing that also gets frequently asked, is how do you do the same things from JavaScript like for a bound control. Well first you still need a control that has the proper CSS applied to it. To assign a icon character from JavaScript can be done one of two ways.
Option 1:
var myChar = "\uf33b";
Option 2:
var myChar = String.fromCharCode(parseInt('f33b', 16));
In Javascript you can use \uXXXX where the XXXX is the 4 hex characters after the &#x, the \u acts in JavaScript just like the &#x does in XML. The other options is to use the String.fromCharCode(parseInt('XXXX',16)) and use the same XXXX as the \u would require. We have to convert the String hexadecimal values into an integer value for this to work. However if you manually convert it yourself, then you can eliminate the parseInt() code. So in this case 0xf33b = 62267, so you can do var myChar = String.fromCharCode(62267);
 You can download the full demo application fonter, which has all 6 fonts, all the css and the xml used to display properly on iOS and Android.
Please note; this REQUIRES the latest tns-core-modules; 1.5.1 on iOS and v1.5.0 or greater on Android. If you are using an earlier version of the core modules then you should read my prior fonter post from how you need to setup the iOS registration.
If you have any other ideas for blog posts; feel free to comment.
This saved my sanity today. Thank you thank you!
Great tutorial! I was wondering if you ever had issues using fonts with a webpack bundled build for iOS? I followed your tutorial and my fonts load perfectly except for builds with webpack.
I honestly haven't tried webpack with the fonts. However, I suspect that it should work a lot better now as the webpack system was overhauled for NS 5.0.