
(Please make sure to read the update at the bottom of the post)
So, I was minding my own business last week, by reading about everyone's issues in the NativeScript forum. Well, ok, so I wasn't minding my own business, we can pretend I was...
So, I saw this post about CodeSign error: entitlements are required and tried to help a little. The issue actually ends up being the newest version of XCode has some issues that has been causing problems for people in all sorts of communities.
Well, I told Aaron, I would do a blog post the next day on the plugin. My how time flies when you are swamped with stuff to do and it also being Christmas week; so it has been a week since I said the next day. (Sorry, about that Aaron!)
 So I am going to go with his ZXing plugin that he was trying to turn into a NativeScript plugin to show how to native Android and native iOS libraries and turn them into awesome NativeScript plugins.
If you just want to look at the code or demo the repo is at https://github.com/NathanaelA/nativescript-zxing. So here is how I go about making a plugin in from a native library.
- Find the iOS (ZXingObjC) and Android (ZXing) versions.
- Study the documentation to see how to install them & build the platform files.
- Study the documentation to see how to call them & build the js wrappers.
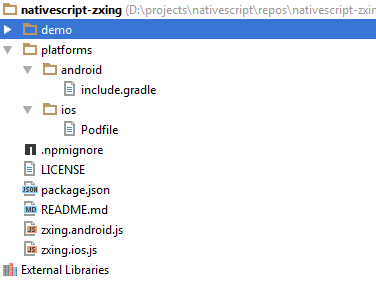 First thing we need to do is create a new project folder; since this is for ZXing; I created a folder called nativescript-zxing. In this folder I created a several files.
The LICENSE file
The first file is the LICENSE file; I need to make sure that I give credit where credit is due and outline my license and the library authors licenses. Most the time I use a MIT license for my stuff; however in this case since both the iOS & Android parts are already under the Apache license, I used the Apache license to keep everything the same.
The package.json
The second file is the package.json file. This one pretty straight forward, however since I have seen several mistakes in other NativeScript plugins, I am going to cover it.
{
  "name": "nativescript-zxing",
  "version": "1.0.0",
  "description": "A Simple ZXing barcode reader/writer wrapper",
  "main": "zxing.js",
  "nativescript": {
   "platforms": {
      "android": "1.4.0",
        "ios": "1.4.0"
   }
  },
  "repository": {
    "type": "git",
    "url": "https://github.com/nathanaela/nativescript-zxing.git"
  },
  "keywords": [
    "NativeScript", "Barcode", "JavaScript", "Android", "iOS", "ZXing"
  ],
  "author": {
    "name": "Nathanael Anderson",
    "email": "nathan@master-technology.com"
  },
  "bugs": {
    "url": "https://github.com/nathanaela/nativescript-zxing/issues"
  },
  "license": {
    "type": "APACHE",
    "url": "https://github.com/nathanaela/nativescript-zxing/blob/master/LICENSE"
  },
  "homepage": "https://github.com/nathanaela/nativescript-zxing",
  "readmeFilename": "README.md"
}
The important parts are:
- You must have the nativescript.platforms key section like I have. If you are not supporting iOS or Android you can remove one of those sub-keys; but you need to support at least one valid platform. Please note this version you use is the minimum platform version you support. DO NOT SET IT TO THE LATEST version unless it absolutely requires the latest version. Please use 1.x.0 so that it will work on all versions of 1.x -- I don't know how many plugins I've had to manually change this value to work on the latest Android runtime, because the author put the latest iOS runtime in both spots which is later than the Android version, so it throws an error during install.
- It is highly recommended you have the main key set so that NativeScript isn't guessing which is your main JavaScript file. This has causes problems several times so far, so set it.
- PLEASE link back to the repository for your plugin; it makes it a lot easier to report any issues, create pull requests and/or see if anything has been fixed, etc...
- Please include the license information, it makes is easier to verify that the plugin can be used for my project.
Android Runtime
So, lets start with the Android version; in this case after reading the documentation; I found out the wiki has the information we need to know. Most the time the readme has enough information, but in this case I had to actually search for it, and finally found the pieces we need to know in the wiki. The documentation has a nice little section on using a prebuilt Jar or Maven. Since we are using Gradle for Android, we can use the Maven stuff and eliminate having to package up or compile anything (This is the best option).
However, in some cases if the project is no longer being maintained or you have to create your own fixes you may need to build and distribute the .jar or .aar file with your project like I need with my NativeScript-WebSockets project. In the event you need to distribute your own JAR files; put them in the platforms/android/libs directory.
In our case, since the project is maintained and on Maven, we can easily just create a include.gradle and then NativeScript will handle the rest. The include.gradle file needs to be put in the platforms/android folder. The include.gradle file looks like this:
android {
    productFlavors {
        "nativescript-zxing" {
            dimension "nativescript-zxing"
        }
    }
}

dependencies {
   compile 'com.google.zxing:android-core:3.2.1'
   compile 'com.google.zxing:core:3.2.1'
}
In your file; you need to change both places for the plugin name. And the dependencies is where we link to the our libraries. Now how do I know what they are named? Well first of all we used the Maven link from the Wiki documentation, and then went into the core folder to get the latest version. 3.2.1; The project is called com.google.zxing and it is a sub-project called core. So the compile line is "compile 'com.google.zxing:core:3.2.1'". The other compile line is an optional dependency that I decided to include on the Android side of the plugin. I'm not currently using it in the JS code; but in future versions it would be very useful. So I am including it in the build process. This is ALL that is required to get the Android version of the plugin to be built into your application.
iOS Runtime
The iOS runtime is much simpler as the docs on the site list what we need to know; we don't have to go searching anywhere else. So what you need to is create a file called Podfile and place it in your platforms/ios folder. This file contains a single line:
pod 'ZXingObjC', '~> 3.0'
Now the installation says to put a platform :ios '7.0' into your Podfile; however this is NOT recommended since NativeScript is handling the platform information and will actually set it to 8.0 when you are using Podfiles. So it is better to only add the single pod line.
We are now all done with the runtime side; the platforms/ios/Podfile and platforms/android/include.gradle will automatically download and install all the needed files to link it into your project. The next part is where the fun begins...
Creating a cross platform wrapper
This where you have to put on your thinking hat. You need to decide how you want your api to be called and what features you want to expose. You can even do what NativeScript does in some cases and expose a ios or android property to access the underlying library. In our case the wrapper is going to be very simple; I just want to show you how do it. All I am going to do is expose how to create a new barcode image.
iOS Wrapper
So first we need to create a zxing.ios.js file (please notice in my package.json I set the main key to "zxing.js"). NativeScript will automatically RENAME the .ios. version of the plugin when it is building your app on the iOS platform and strip out the .ios; so the file will become zxing.js automatically.
This file is a simple constructor that literally does nothing as I am trying to keep this example very simple.
function NativeZXing() {
    if (!this instanceof NativeZXing) {
        return new NativeZXing();
    }
}
I do typically safe guards I try to add all of my plugins. It simplifies usage of the plugin you can actually do "var zx = NativeZXing();" forgetting the "new" and it will still work since the constructor function will call new for them. Some people prefer to throw an error rather than automatically using new. My policy is in plugins attempt to be as user friendly as possible.
The next step is to create the function that will create a barcode. So looking at the documentation the way to create a CGImage is this code:
ZXMultiFormatWriter *writer = [ZXMultiFormatWriter writer];
ZXBitMatrix* result = [writer encode:@"A string to encode"
                              format:kBarcodeFormatQRCode
                               width:500
                              height:500
                               error:&error;
  CGImageRef image = [[ZXImage imageWithMatrix:result] cgimage];
So I decided our function will look like this...
NativeZXing.prototype.createBarcode = function(options) {
    var encode="NOTHING", width=100, height=100, format = this.QR_CODE;
    if (options) {
        if (options.encode) { encode = options.encode; }
        if (options.width) { width = options.width; }
        if (options.height) { height = options.height; }
        if (options.format) { format = options.format; }
    }
    var error = new interop.Reference();
    var writer = ZXMultiFormatWriter.writer();
    var result = writer.encodeFormatWidthHeightError(encode, format, width, height, error);

    if (result) {
        return UIImage.alloc().initWithCGImage(ZXImage.imageWithMatrix(result).cgimage);
    } else {
        return error.localizedDescription().toString();
    }
};
This first 7 lines are pretty simple; they set the defaults and allows the options dictionary to override the defaults. These might be better as properties on the object, but for simplicity they are parameters. The next line might not be so obvious; "var error = new interop.Reference();" In ObjectiveC anytime we need to pass a pointer/reference for marshalling into a runtime function call we need to create a reference. If you look up above in the example; you will see error being passed as &error. That told me I needed to pre-create the reference so I could pass it in and get the result. In most cases you can just pass null instead of an interop.Reference() if you don't want the results; but in this case I decided to capture the error.
The next line is an easy conversion; the Documentation says *writer = [ZXMultiFormatWriter writer] this converted into NativeScript is simply var writer = ZXMultiFormatWriter.writer();
The following line is a lot more complex to parse and really makes you have to think about how to convert it. So looking at the [writer encode:@"A string to encode" format:kBarcodeFormatQRCode width:500 height:500 error:&error]. The rule is the first parameter is ignored, lets parse this. The NativeScript code starts with writer.encode since that is the iOS call. Skip the first parameter, then the next parameter is "format" so we append a proper cased "Format" to the writer.encode to make it writer.encodeFormat. We proceed through each of the following parameters and appending a proper cased version. So the call finally ends up being writer.encodeFormatWidthHeightError(... params ...); Once you understand how it isn't too bad to parse. However, the issue can be if the documentation is wrong and their are other parameters. You MUST have every parameter accounted for in the function name for the NativeScript to be able to marshall the call into the iOS runtimes.
The next line just checks to see if we got a result; if so we convert it to an image or we return the error. To convert the result into an image the next line is [[ZXImage imageWithMatrix:result] cgimage] Again, the calls are not to hard to parse so this one ends up being; var image = ZXImage.imageWithMatix(result).cgimage;
Now in our plugin case I actually converted the CGImage into a UImage since all the NativeScript code seems to use UImage's. So that the extra UIImage.alloc().initWithCGImage() code that I added.
The last two things I add to the wrapper are any ENUM or FEATURE flags, to keep consistency for your application code. For example the format of the barcode can be chosen using format parameter. Would your really want to add to you *application* code like ZXBarcodeFormat.kBarcodeFormatQRCode; for iOS and com.google.zxing.BarcodeFormat.QR_CODE for android to determine that you are using QR code barcodes? No, me either. So I wrap the feature flags into JS feature flags like so:
NativeZXing.QR_CODE = NativeZXing.prototype.QR_CODE = ZXBarcodeFormat.kBarcodeFormatQRCode;
In this case since ZXing appears to only have a barcode types as the feature flags; I attach them directly. But if ZXing had a lot of different features I would do something like this:
BARCODE = {QR_CODE: ZXBarcodeFormat.kBarcodeFormatQRCode,...};
NativeZXing.BARCODE = NativeZXing.prototype.BARCODE = BARCODE
And finally we next to export the entire module with this code:
module.exports = NativeZXing;
Awesome the code is complete on iOS. When you createBarcode({encode: "Hi"}); you will get a UImage back on iOS.
Android Wrapper
Just like we did on iOS; we create a file called zxing.android.js. In this file we have the exact same constructor, it also has the same module export statement. However the actual code to generate the Image is different. So here is the Android version.
NativeZXing.prototype.createBarcode = function(options) {
   var encode="NOTHING", width=100, height=100, format = this.QR_CODE;
   if (options) {
        if (options.encode) { encode = options.encode; }
        if (options.width) { width = options.width; }
        if (options.height) { height = options.height; }
        if (options.format) { format = options.format; }
    }
    var hints = null;
    var writer = new com.google.zxing.MultiFormatWriter();
    var result = writer.encode(encode, format, width, height, hints);
    width = result.getWidth();
    height = result.getHeight();
    var pixels = [];
    for (var y=0;y<height;y++) {
        var offset = y*width;
        for (var x=0;x<width;x++) {
            pixels[offset+x] = result.get(x,y) ? 0xFF000000 : 0xFFFFFFFF;  // Black : White
        }
    }
    var bitmap = android.graphics.Bitmap.createBitmap(width, height, android.graphics.Bitmap.Config.ARGB_8888);
    bitmap.setPixels(pixels, 0, width, 0, 0, width, height);
    return bitmap;
};
As you can see the first 7 lines are the same. However, the writer line is different. Typically the documentation will tell where in the namespace the function resides. In this case I actually looked at the source code to determine where the MultiFormatWriter function was at. It showed it was using "package com.google.zxing" namespace and is a class called MultiFormatWriter. So that is converted to var writer = new com.google.zxing.MultiFormatWriter(); The next line is equally simple since we are looking at the source code (Documentation is typically easier, but in this case the source was quicker). So it is called exactly as it is displayed in the source code: var result = writer.encode(encode, format, width, height, hints);
The examples I found on how to use MultiFormatWriter and convert it to an image; showed us basically scanning the result set and generating a simple pixel array. Creating a new Bitmap; and then you pass that array into your new bitmaps' setPixels function. Converting that code to JS was trivial as basically all you need to do is go to the android documentation and find out the full namespace for the things. So the code Bitmap.createBitmap becomes android.graphics.Bitmap.createBitmap. And Bitmap.Config.ARGB_8888 also gets prefixed with android,graphics. to become android,graphics.Bitmap.Config.ARGB_8888.
The last thing we do is add our enum value for the Android side to our QR_CODE source
NativeZXing.QR_CODE = NativeZXing.prototype.QR_CODE = com.google.zxing.BarcodeFormat.QR_CODE;
Again, this keeps it so that in the application you can easily just use ZXing.QR_CODE and never have to worry about the actually underlying platform value.
Creating the readme.md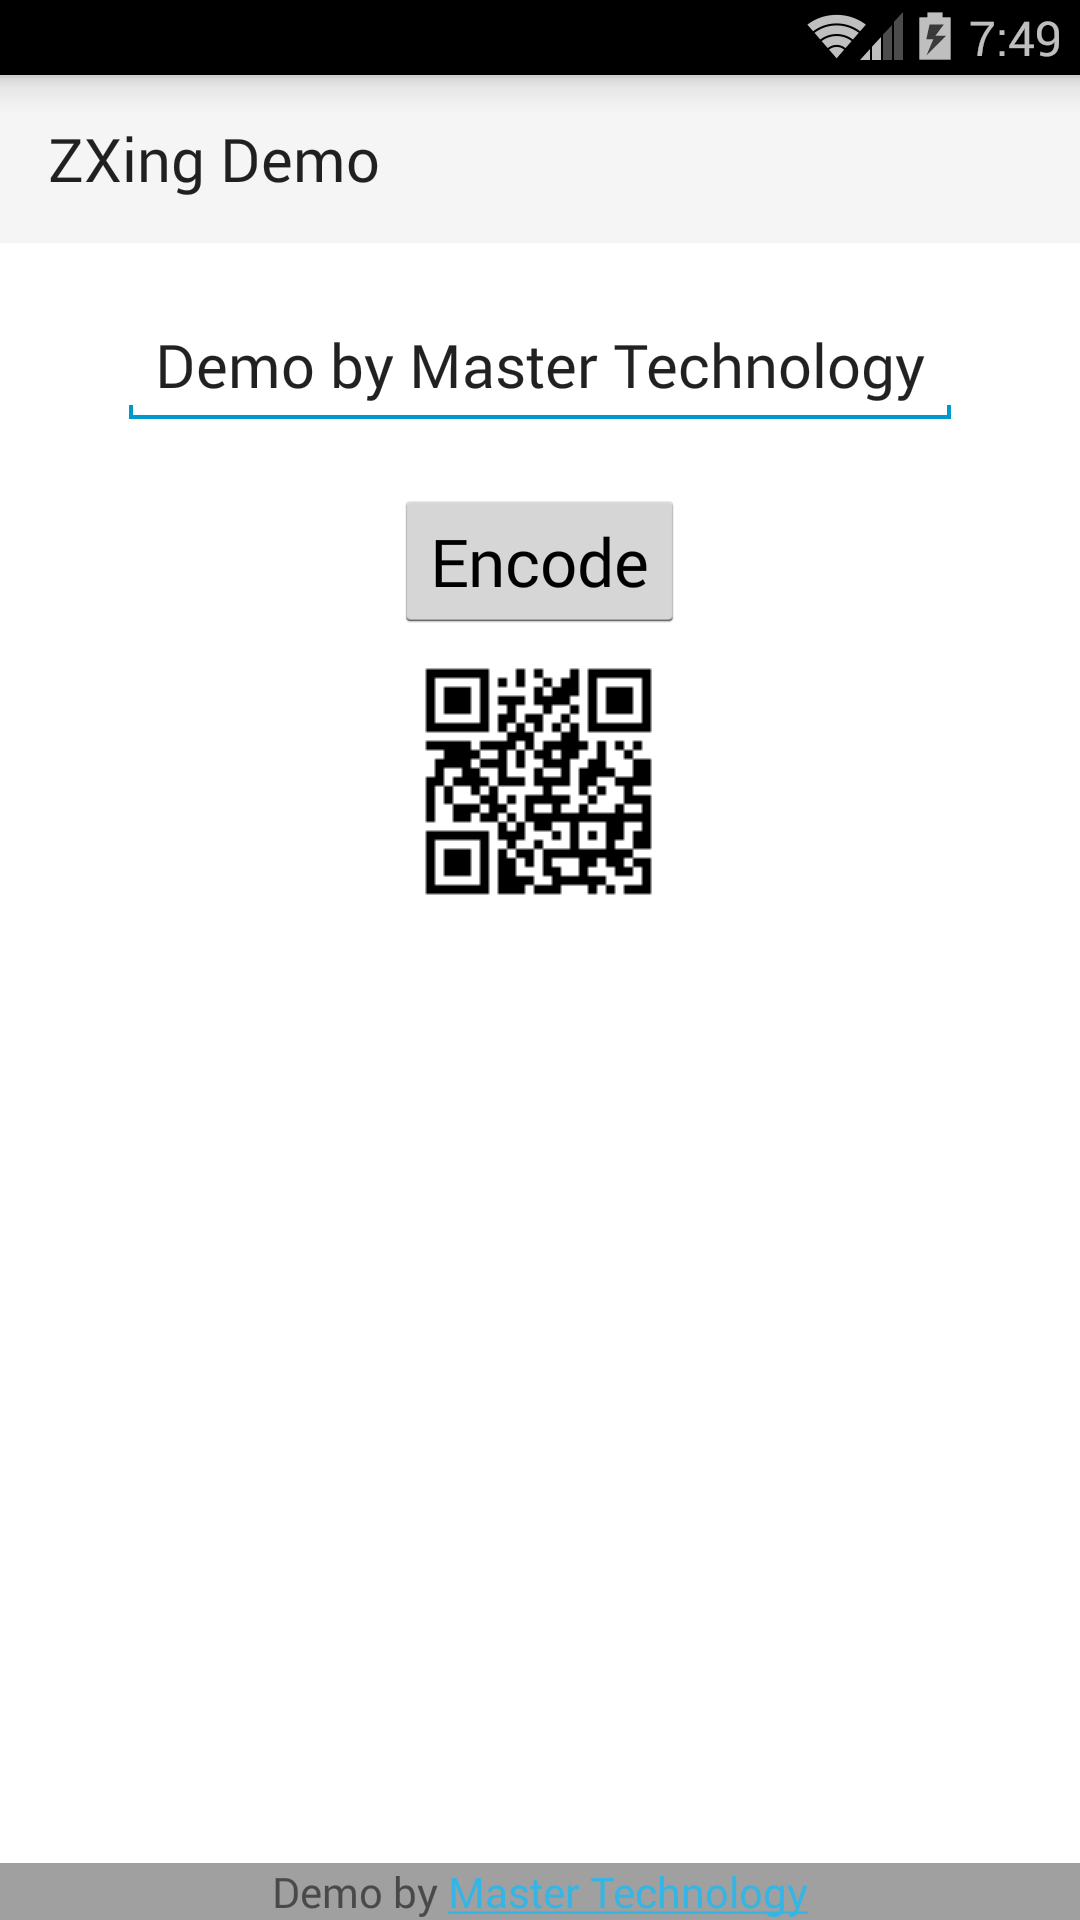
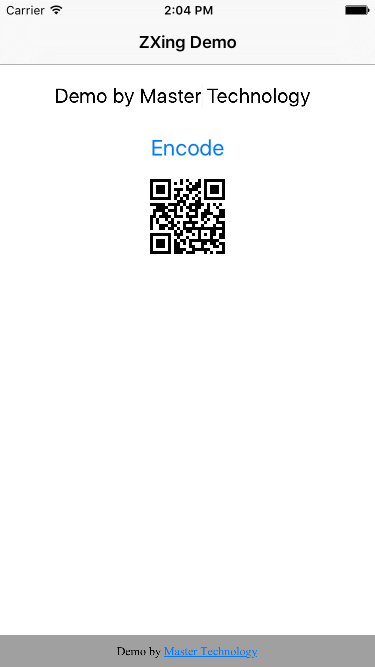
The next thing you need to do is create documentation; people need to understand how use you plugin. If you can create a demo that is even better. For example for this sample plugin I created a simple demo that lets you type in anything; and it will give you the QR code for it. You can use the demo to help implement the plugin if the instructions aren't enough.
Wrapping it up
The final things you need to do is create a repo; and commit your code. If it is public publish it to npm so that everyone else can use it. If this is a private plugin; you can do tns plugin add /path/to/plugin to install it. For example this plugin's repo is: https://github.com/NathanaelA/nativescript-zxing and can be installed via tns plugin add nativescript-zxing.
If you have any ideas on future blog posts; please feel free to comment.
UPDATE
The newer layout for plugins because of some changes in NPM is to do the following:
/demo <-- Your demo goes in here
/src <- Everything else (i.e. what was at the root directory) goes in here.
So then all plugin source code now is in the src folder; then you can do tns plugin add ../src to add it to your demo. Do NOT leave the plugin source at the root anymore -- this will cause building of your demo to fail.